
Removing A Swimming Pool From Your Home
The hot weather has hit Melbourne and people are rushing out to buy new air-con units and fans. Others lucky enough to have a swimming pool are jumping into their water-filled holes in the backyards and escaping the sudden high temperatures with a nice cooling off.
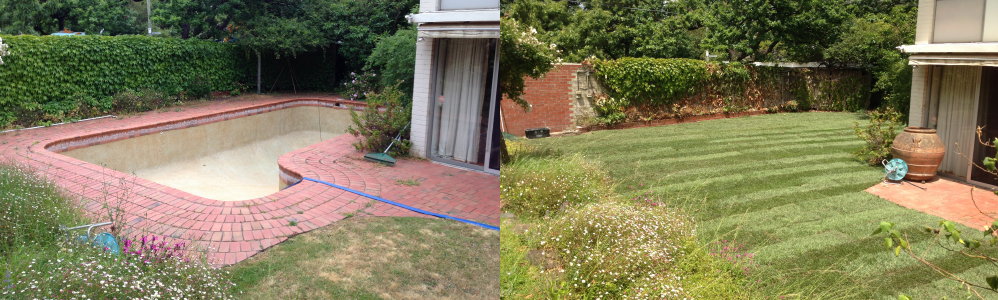
But what if you own a pool and don’t want it anymore? You can’t simply throw it out. Luckily there is a solution. Reverse Pools is a family run company that will remove pools and spas from your home. They have successfully converted swimming pools into underground water tanks, and recreated the space in the yard as a garden, paved area or lawns.
Their techniques are the best in the business so if you feel you can take the heat and want more space in your backyard, check out their swimming pool removal solutions today. Meanwhile, I’ll be looking through the Clarke Rubber catalogue to find a cheap plastic pool to put in my courtyard!
Types Of Swimming Pools And Their Removal Methods
Above-Ground Pool Removal Steps
Removing an above-ground pool is generally a more straightforward undertaking compared to its inground counterpart. These structures sit on the ground’s surface, simplifying the disassembly process. The primary steps involve draining the water, carefully dismantling the components, and then arranging for the removal of the materials.
- Drain the Pool: Begin by shutting off the pump. Use a submersible pump or a siphon to remove all the water. It is important to check local regulations regarding water disposal; often, water must be directed to a sanitary sewer clean-out, not into storm drains.
- Disconnect Utilities: Safely disconnect any electrical connections powering the pump or lights. Also, cap off any plumbing lines.
- Dismantle the Structure: Remove the liner, then take apart the frame, walls, and any supporting hardware. For metal pools, rolling the wall sections can make them easier to transport.
- Remove Decking (If Applicable): If a deck surrounds the pool, it will need to be dismantled. Wood decks can usually be taken apart with basic tools, while concrete patios may require a jackhammer.
- Sort and Dispose: Separate materials like metal, plastic, and wood for recycling or disposal. This can help reduce costs and environmental impact.
- Regrade the Area: Once all components are removed, rake the ground level, add topsoil if needed, and prepare the area for seeding or sodding.
Inground Pool Removal Considerations
Inground pools present a more complex removal challenge. The process typically involves breaking up the existing structure, using heavy machinery, and carefully backfilling the resulting cavity to prevent future settling. The method chosen will significantly impact the final outcome and cost.
- Permits and Approvals: Always secure the necessary permits from your local council before commencing work. Inspections may be required at various stages.
- Water Disposal: Similar to above-ground pools, responsible water drainage is key. Adhere strictly to local guidelines for discharging pool water.
- Utility Safeguarding: Ensure all gas lines (to heaters), electrical connections, and water supply lines are safely disconnected and capped at their source.
- Demolition: This is the most intensive phase. For concrete pools, a jackhammer or an excavator with a hydraulic breaker is used to break up the shell. For fibreglass pools, the process differs but still involves significant demolition.
- Backfilling: The void left by the pool must be filled with appropriate material and compacted in layers to create a stable base for future use.
Partial Versus Full Inground Removal
When dealing with inground pools, you have two main removal options: partial or full.
- Partial Removal: This involves breaking down the top section of the pool walls (typically 18 to 36 inches) and punching holes in the pool floor to allow for drainage. The broken concrete or material is then placed back into the cavity and compacted. This method is often less expensive but may result in some ground settling over time.
- Full Removal: This entails excavating and removing the entire pool shell, including the walls and floor. All debris is hauled off-site. While this is the more costly option, it leaves a clean, open space and can help maintain property value by avoiding potential future construction limitations or settling issues.
The choice between partial and full removal often depends on budget, future plans for the backyard, and local building codes. A full removal provides a more stable and predictable outcome for landscaping or construction.
Managing Debris And Backfilling After Removal
Once the pool structure itself has been demolished, the focus shifts to the responsible management of the resulting debris and the critical process of backfilling the void. This stage is vital for ensuring the long-term stability of your backyard and preventing future issues like settling or sinkholes.
Debris Removal And Responsible Disposal
The demolition process will generate a significant amount of material, particularly with inground pools. For above-ground pools, the components are often lighter and can be dismantled for easier disposal or recycling. However, inground pools, especially concrete ones, will yield heavy rubble. Proper disposal is not just about tidiness; it’s about environmental responsibility and adhering to local regulations.
- Sorting Materials: Where possible, separate different materials like concrete, metal, and plastic. This can sometimes reduce disposal fees and allows for recycling of suitable items.
- Hiring Skip Bins: For larger projects, particularly inground pool removals, hiring a skip bin (or roll-off dumpster) is usually necessary. Ensure the bin size is adequate for the expected volume of debris.
- Transport and Tipping Fees: Be aware of the costs associated with transporting the debris to a landfill or recycling centre. Tipping fees are often charged by weight, so the heavier the material, the higher the cost.
- Recycling Options: Investigate local recycling facilities that accept construction and demolition waste. Some materials, like steel from pool frames, can often be recycled.
Restoring And Repurposing Your Transformed Backyard
With the swimming pool gone, your backyard is a blank canvas, ready for a new life. This is your chance to create a space that truly suits your needs and lifestyle. Think about how you want to use this newly reclaimed area – perhaps for relaxation, recreation, or even a bit of both.
Final Grading For Optimal Drainage
Proper grading is the first step in making your yard functional and preventing future issues. The ground needs to slope away from your home and any structures to direct rainwater effectively. This prevents water pooling, which can lead to dampness problems or even foundation damage down the line. A professional will assess the area and ensure the soil is graded to manage water runoff, making the space more usable and protecting your property.
Establishing New Green Spaces
Transforming the area into a lush garden or a vibrant lawn is a popular choice. You might consider:
- A Play Lawn: Reseeding or laying down turf creates a smooth, open area perfect for children’s games, pets, or simply enjoying some fresh air.
- Vegetable or Pollinator Gardens: The compacted soil from backfilling can be ideal for raised garden beds. With some added topsoil and compost, you can grow your own produce or create a haven for local wildlife.
- Rain Gardens: Utilising the natural depression left by the pool can be an excellent spot for a rain garden. Native plants and the right soil can help manage stormwater while adding natural beauty.
Creating Outdoor Living Areas
Your former pool area can become an extension of your home. Imagine:
- An Outdoor Room: Installing a patio with pavers, adding a pergola for shade, and perhaps a built-in fire pit or seating area can create a fantastic space for entertaining or quiet evenings.
- A Decked Area: A new deck can provide a stable, level surface for outdoor furniture, a barbecue, or even a small outdoor kitchen.
The key is to plan for how you’ll use the space daily. Consider the sun’s path, prevailing winds, and how you want to connect this new area with the rest of your home.
Considering Future Structures
Depending on the type of removal and the engineered backfill used, the cleared space might be suitable for additional structures. If a full removal was performed with proper soil compaction and engineering reports, you might have the option to build.
- Accessory Dwelling Unit (ADU): A small guest house, home office, or studio could be a valuable addition.
- Sheds or Garages: Depending on local zoning and your property layout, you might consider building a new shed or even a small garage.
It’s important to consult with local council regulations and potentially a building surveyor before planning any significant new structures on the former pool site.


